

Recording a Repair Intake in Automan
The moment a unit is handed over the counter decides more than any other in the whole repair flow — and it is the moment most often rushed, because the customer is standing right there.
Every dispute that arrives later was born in this minute: the scratch that supposedly was not there, the accessory that supposedly came with it, the price that was supposedly lower. Recording it properly now is far cheaper than arguing about it later.
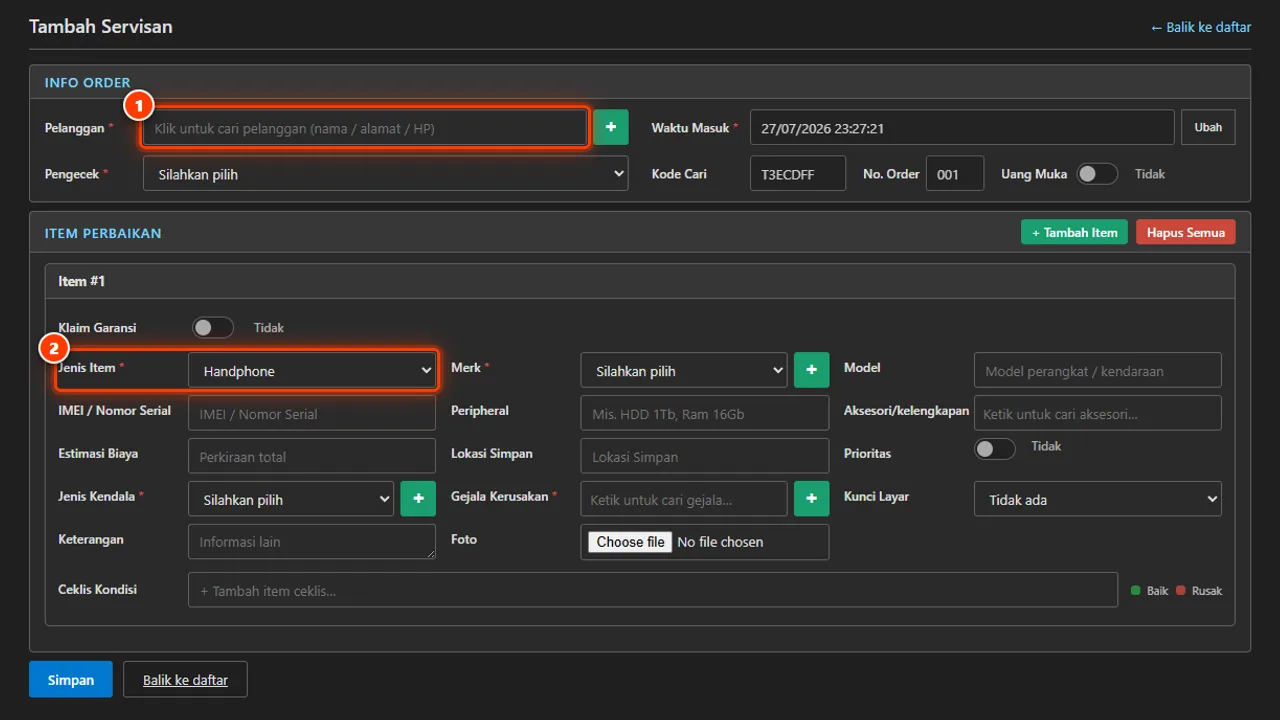
Once this flow becomes habit, one unit takes a minute or two to enter — and most “that’s not how it looked when I brought it in” disputes disappear on their own.
Before you start
- Store App active with the Repair Management module installed.
- The repair master data and services are filled — see the Repair Master Data and Services tutorial.
Steps
-
Open Repairs → List → Add
This tutorial covers the full path (Add). For express repairs finished on the spot, there's a Quick Add path — done in 1–2 steps, covered in the Repair Flow tutorial.

Add for full input; Quick Add when the queue is busy. -
Pick or add the customer
Search by name/phone number. New customer? Use quick-add straight from the form — the system checks for duplicate phone numbers so one person never gets recorded twice.

Quick-add a new customer without leaving the form — duplicate numbers checked automatically. -
Fill in the unit data
Unit type, brand, and model. A counter also gets an IMEI / serial number field. A workshop does not — instead it gets a vehicle identity block: plate number, chassis number, engine number, odometer reading, and production year.

Just enough unit data: type, brand, model, serial when used. -
Fill in accessories, the complaint, and its fault group
Whatever the customer left with the unit — SIM card, memory card and case at a counter; registration papers, spare wheel, jack and warning triangle at a workshop. Then the complaint in the customer's own words, and the fault group it belongs to. A counter additionally has a screen-lock field (PIN, password, or pattern) filled in with the customer's consent; that field does not exist in a workshop because it is not needed there.

The complaint recorded in the customer's words, plus its issue type. -
Fill in the intake condition checklist and photos when needed
Physical defects present at intake get recorded here. This checklist and the photos are the two-way anchor at handover later.

Checklist and photos = the two-way anchor at handover later. -
Fill in Estimasi Biaya, Lokasi Simpan, Prioritas and Keterangan
Estimasi Biaya is the figure you agree in front of the customer — entering it now is far cheaper than arguing later. The next field renames itself with your business type: Lokasi Simpan at a counter (which shelf), Lokasi Parkir at a workshop (which corner of the yard). Prioritas sets the work order, and Keterangan takes anything the person doing the work needs to know that fits no other field.

The agreed estimate + where the unit is stored, so it's easy to find. -
Save the transaction
The unit immediately gets its initial status and enters the technician queue.

Once saved, the unit enters the technician queue immediately. -
Print or send the intake receipt
Per the shop's flow: print the receipt (with tracking code/QR) or send it via WhatsApp when connected.

The intake receipt carries the customer's tracking code/QR.
What you end up with
The incoming unit is recorded, holds an initial status, can enter the technician queue, and gets a receipt/tracking code per the shop's settings.
If something goes wrong
The customer turns out to already exist
Use the phone-number dedup result — pick the existing record so the repair history stays in one thread.
The Repair menu doesn't show
Check the Repair Management module in Module Setting and your user's access rights.
Data incomplete while the queue is busy
Use Quick Add first; complete the other fields once the customer is served.